Polly Plush: Sewing Instructions
Before you start
Have you ever made a plushie before? If not, this one is going to be a trial by fire. I’d highly recommend doing some small, simple things first to get yourself comfortable with curved seams, clipping seam allowances, sewing , turning, stuffing, and ladder stitching. If you’re not comfortable with those things already, Choly Knight’s Starter Plush Pack free tutorial is an excellent place to start. You can speed through up to level 3 of that tutorial in an afternoon or two, then pick back up here.
Differences from Choly Knight
One major difference between Choly Knight’s tutorials and the methods used here is that Choly Knight uses stretch fabric. Polly assumes no stretch by default. If you use a pattern designed for one amount of stretch with a different amount of stretch, the final shapes when stuffed will be slightly different, but the methods are all the same.
The other major difference is that Choly Knight uses a lot of applique for faces, eyes, and other details. Some people like applique, some people do not. If you discover that you do not, don’t despair, it’s not required in any way for Polly. If you discover that you do, feel free to add some.
Setting Your Options
The Polly in the photos for this tutorial was printed at 33.5% scale, with slightly increased torso length, leg length, arm length, and hip width relative to the default options. The proportions of your pieces will vary slightly. The part options used for the photos in this tutorial are the split head and the cylindrical legs.
The mirrored head option gives you a single piece for the face front instead of two. This is useful if you want to do embroidery on the front and keep it symmetrical, but it’ll make the shape of the head a little boxier if you’re using non-stretch fabric.
The hairline head option cuts up the face and back of the head to give you pieces you can cut out of faux fur for a fluffy scalp.
The snout head option gives Polly a little bit of an animal-like nose, as shown on the right in the lineart image.
The anthro legs option gives Polly bendy digitigrade legs, as shown on the right in the lineart image.
Assumptions for how to handle seams
Polly is small and complicated. Fortunately, all the seam allowances are on the inside, so you don’t need to worry about zig-zagging or otherwise finishing them. I pressed some of the seams open as I was sewing up the Polly for this tutorial so it would be easier to see them in the photos. Whether or not you do this makes little difference once the doll is stuffed.
Sew the body side seams
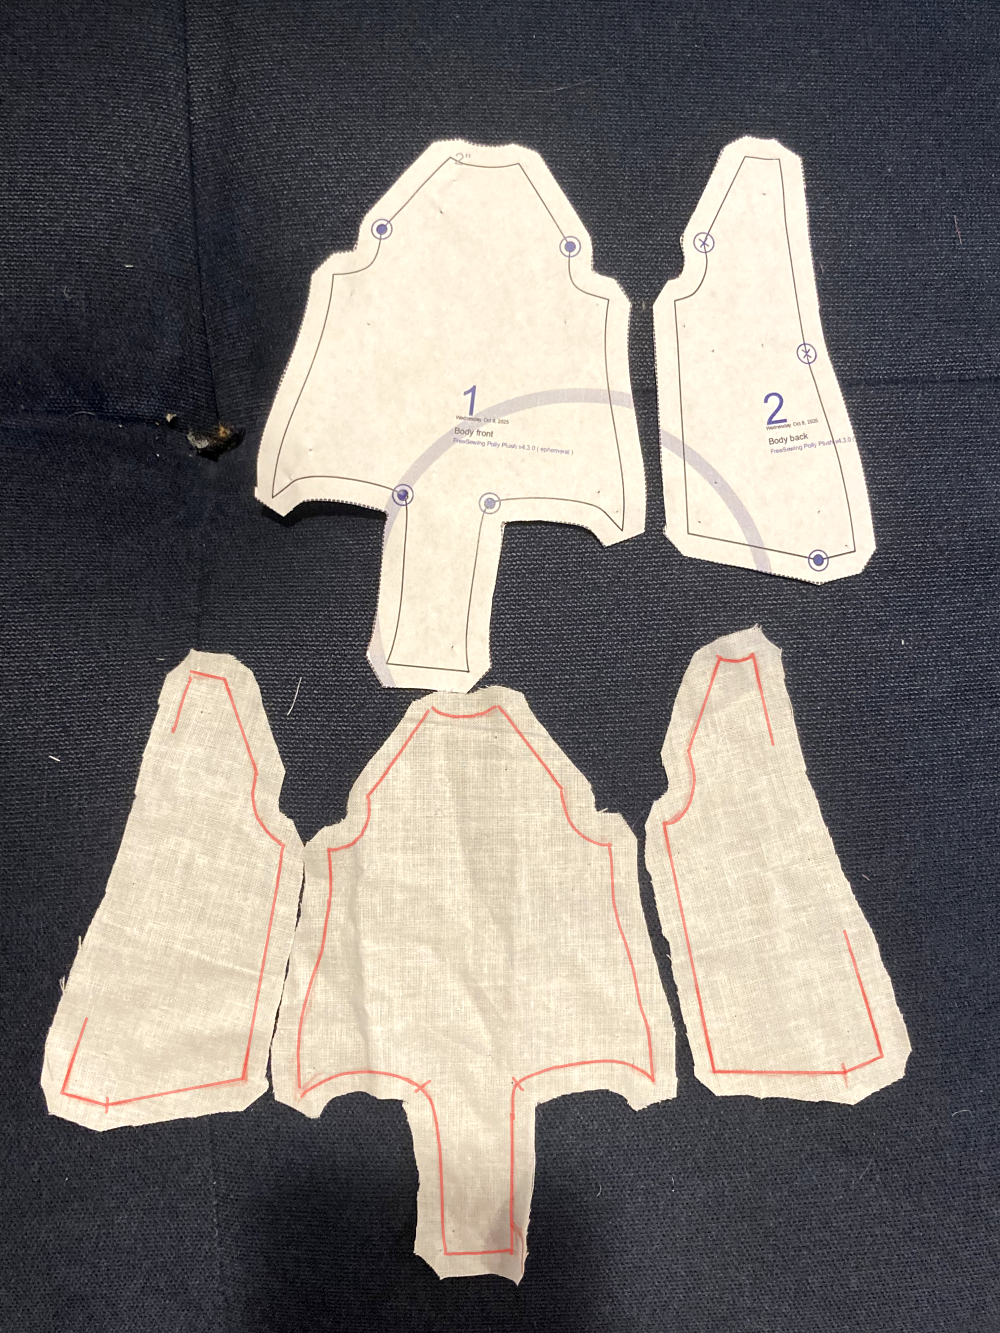
You should have 1 body front piece and 2 mirrored body back pieces. I recommend tracing the seam lines and notches onto the wrong side of the fabric pieces directly, like I’ve done here (though I’ve traced over the lines digitally for visibility). This’ll help with precisely lining up the arm and leg curves in later steps.
Sew the body back pieces to the body front piece along the sides, from the bottom of the armpit curve to the top of the hip curve. Right sides together.
Legs
Assemble the anthro legs
The default cylinder leg piece is one big tube + a circular foot piece for the end. If you’re using that leg, skip to the next step.
If you’re using the anthro legs, it’s a little bit more complicated.
Close the darts on the outer leg (piece 3a) and the foot upper (piece 4a) first.
Then attach the outer leg (3a) to the inner leg (3b) along the front seam. There are two notches at the stifle and hock (think knee and ankle) to help align these strange curves. Clip the seam allowances at the hock (ankle) so they don’t pull on this concave curve when the piece is turned right side out.
Attach the foot upper (4a) to the leg pieces. This seam is marked by the help text option with the letter G. The notch in the center of the foot upper piece lines up with the seam where you joined the two leg pieces. The dart goes towards the “toe” of the foot.
For the rest of the steps, you’ll treat this partially assembled anthro leg as if it’s just piece 3 for the leg.
Attach the leg to the body
This next part is hard. We’re doing it early in the assembly so that if you mess it up and have to cut out new pieces, you won’t have spent too much time on them yet. If you’re feeling tired or frustrated at all, here’s your cue to take a break. Get a hot drink. Take a walk. Remind yourself that you can do hard things. And read this step in its entirety before you start cutting or stitching anything.
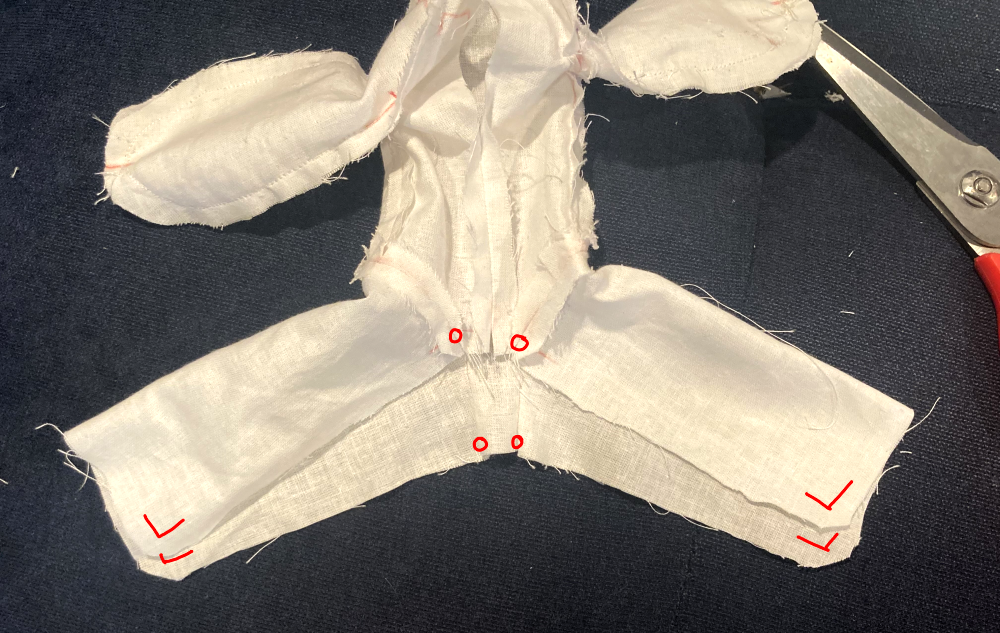
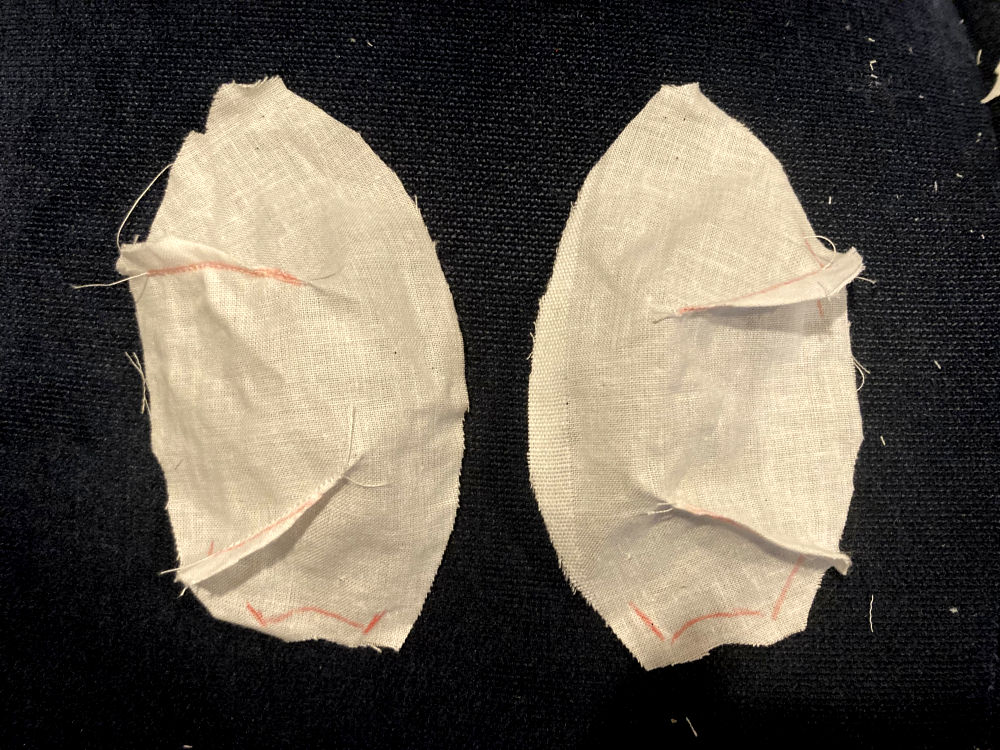
We’re going to attach the top of the leg pieces to the bottom of the body pieces. They should look like this:
The curve along the bottom of the body piece goes from the crotch, up to the curved point on the hip marked with a notch, down to the bottom of the seam where the body front and body back were attached, and then almost, almost to the center back. There’s an angle and a notch a small distance from the actual back. Keep this notch in mind.
The leg piece looks almost symmetrical, but the curve on the side that needs to attach under the crotch is more dramatic. It has two notches marked, one that needs to match the curved notch on the hip, one that needs to match the side seam. The side of the leg piece that approaches the outer edge of the body piece only matches up to the bottom notch on the back piece. Don’t sew it all the way to the edge.
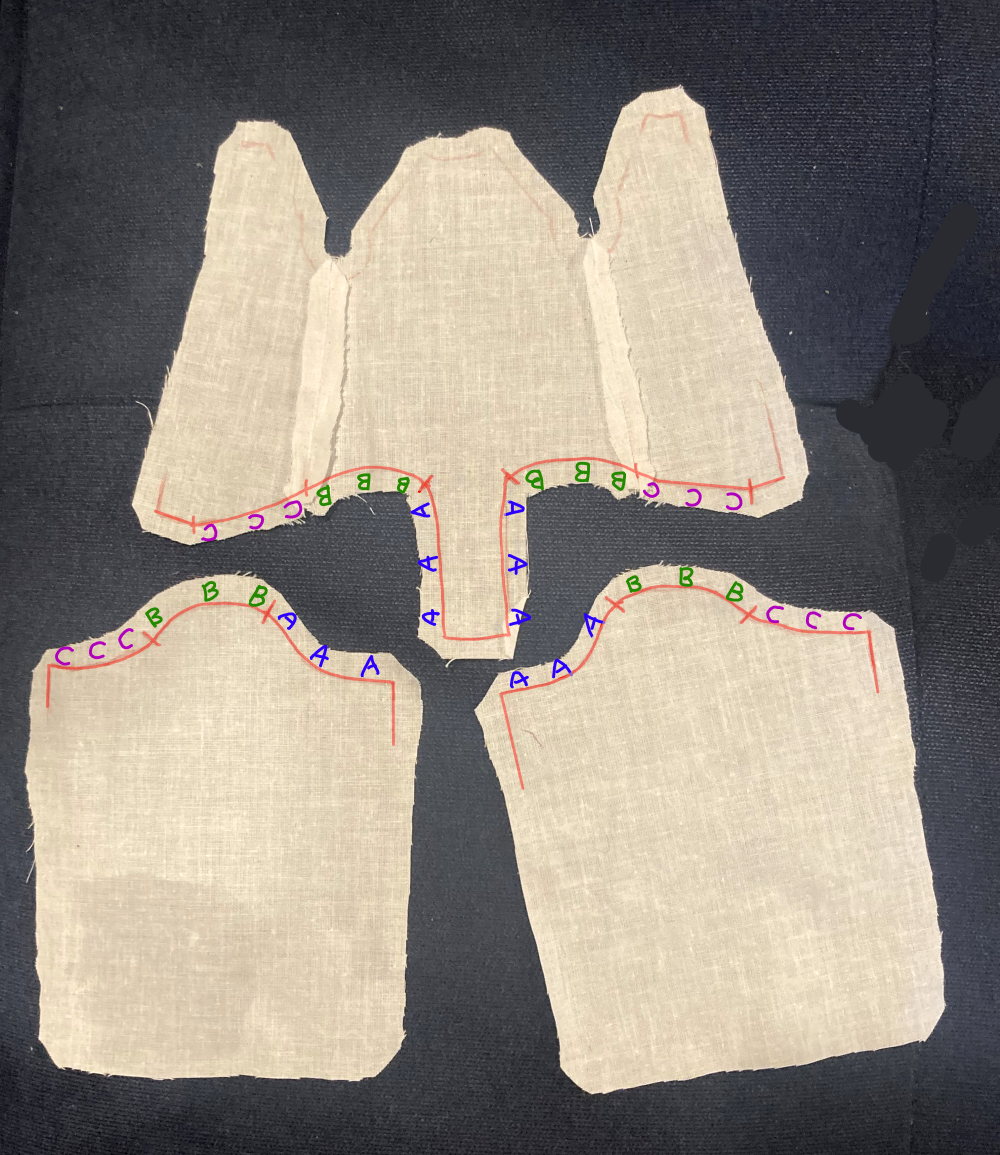
You’ll want to transfer the curved line at the top of the leg pieces onto the wrong side of your fabric to help you align the curve perfectly. The three sections of this seam are also marked with A, B, and C when help text is turned on.
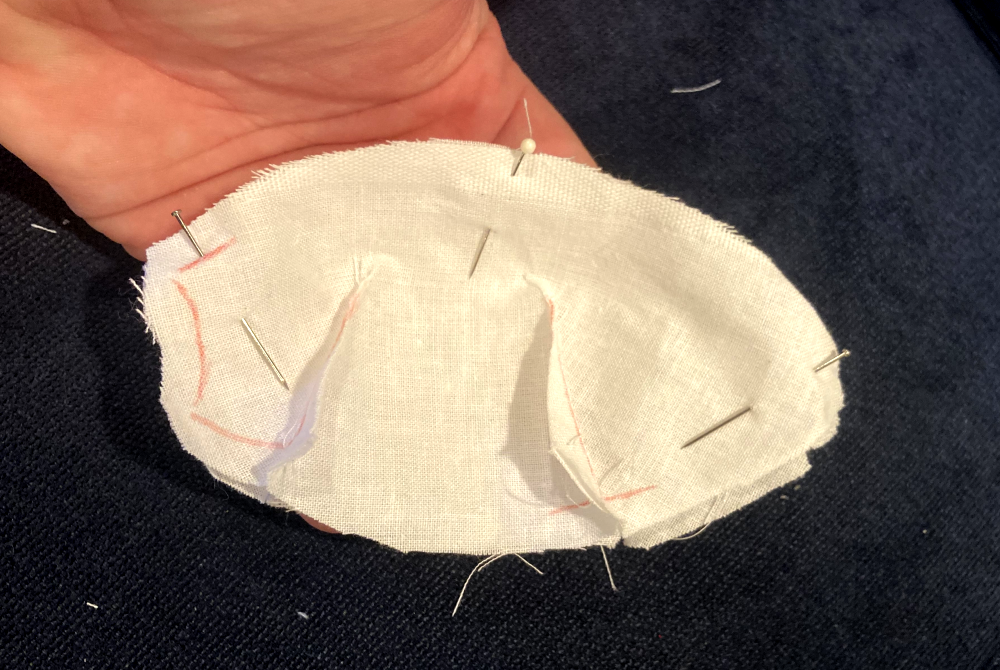
The seam you have to sew between these two pieces is very curved. The pieces on both sides of the seam curve the same way in some sections, and opposite to each other in other sections. In order to pin these pieces together and align those curves so we can sew them, we need to snip the seam allowance first, so the extra fabric isn’t holding the curves in place.
That should look something like this:
Two or three snips between each of the notches should be enough. Make sure your cuts go to, but not through the line you’ve marked for the actual seam.
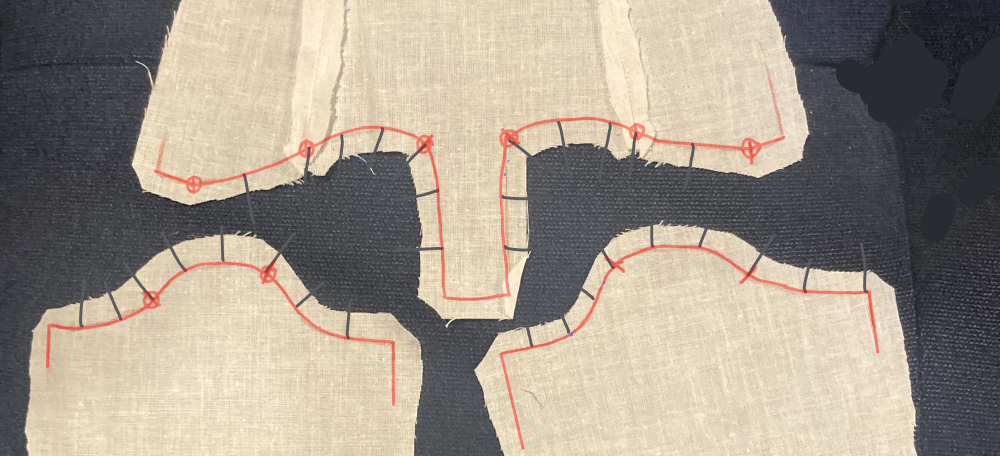
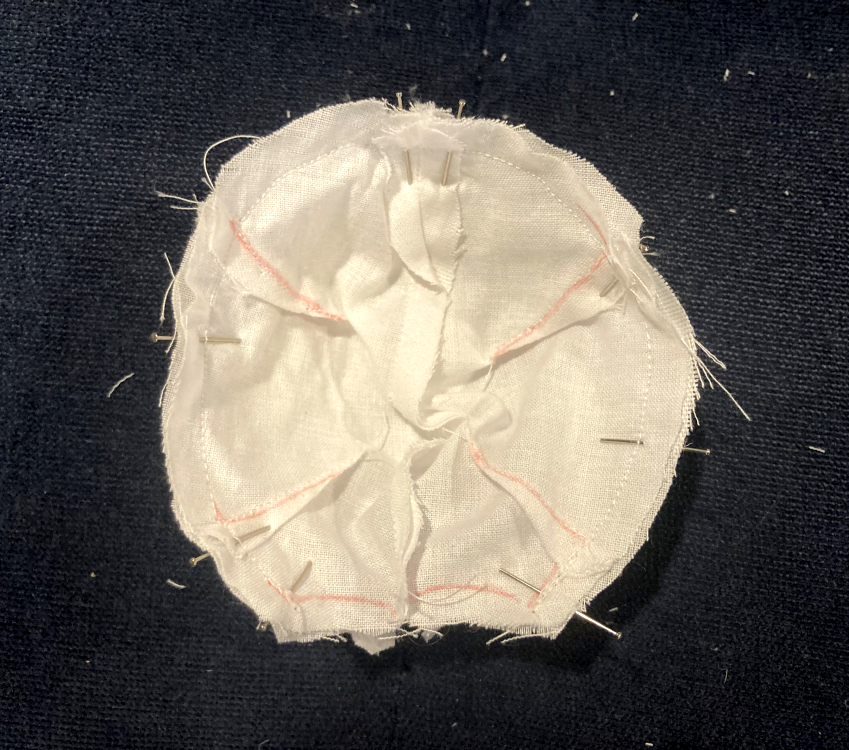
Work on one leg at a time as you pin these pieces together, right sides facing. Start by lining up and pinning the back notch (align the leg with the notch, not the end of the back piece!), then the front under the crotch. Then match the notches in between, then add two or three more pins between each notch, shifting the edges of the fabric carefully to make sure the stitching lines are lying perfectly on top of each other at every point you pin. You’ll be bending the fabric in weird ways, so take your time on this step.
Once you’re satisfied that you’ve matched and pinned the curves to the best of your ability, sew along that line.
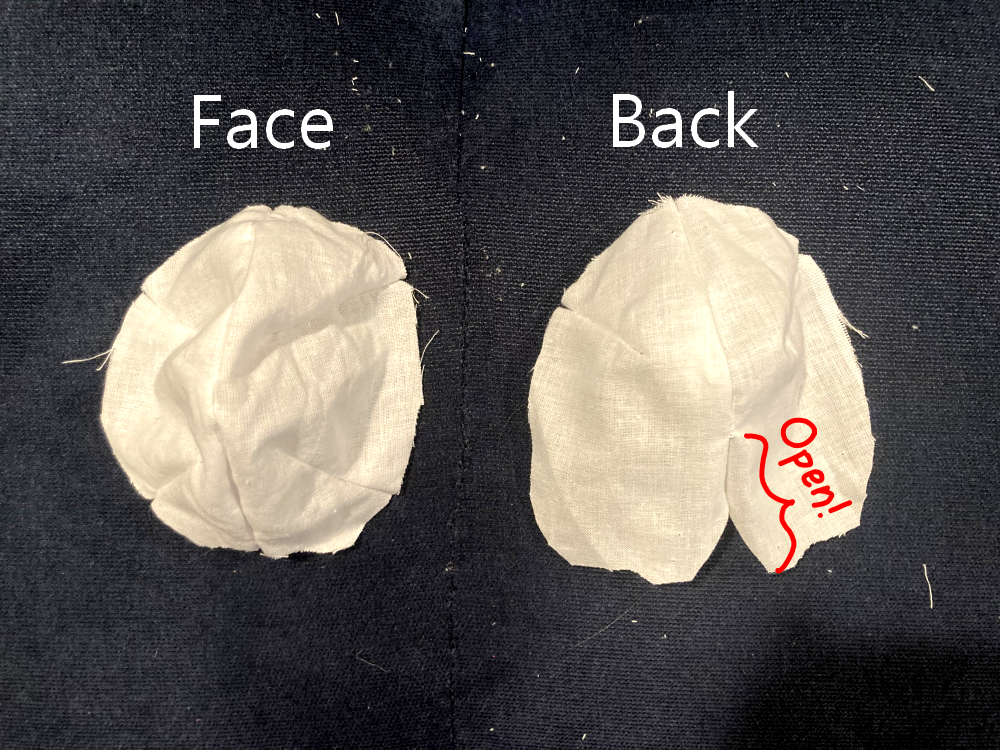
Once you do the same on the other side, the result will look something like this:

Give yourself a pat on the back.
Arms
Attach the arm bottom to the armscye curves
The body pieces have two U-shaped curves in them at the top of the side seams. The ends of these curves have notches on them, but the piece then extends up further in straight lines up to the end of the neck. The curve you care about for this step is the one marked with the letter D in help text.
After you already handled the leg curves, this step is easy. Clip the seam allowance along both the curve on the arm bottom pieces (5) and the arm curves on the body. Pin the arm bottom to the body pieces, right sides facing. This will feel slightly weird, because right sides facing usually means the entire piece is reversed, but you’re effectively still handling this piece right side out. Sew those arm curves between the two notches.
Understanding the arm top
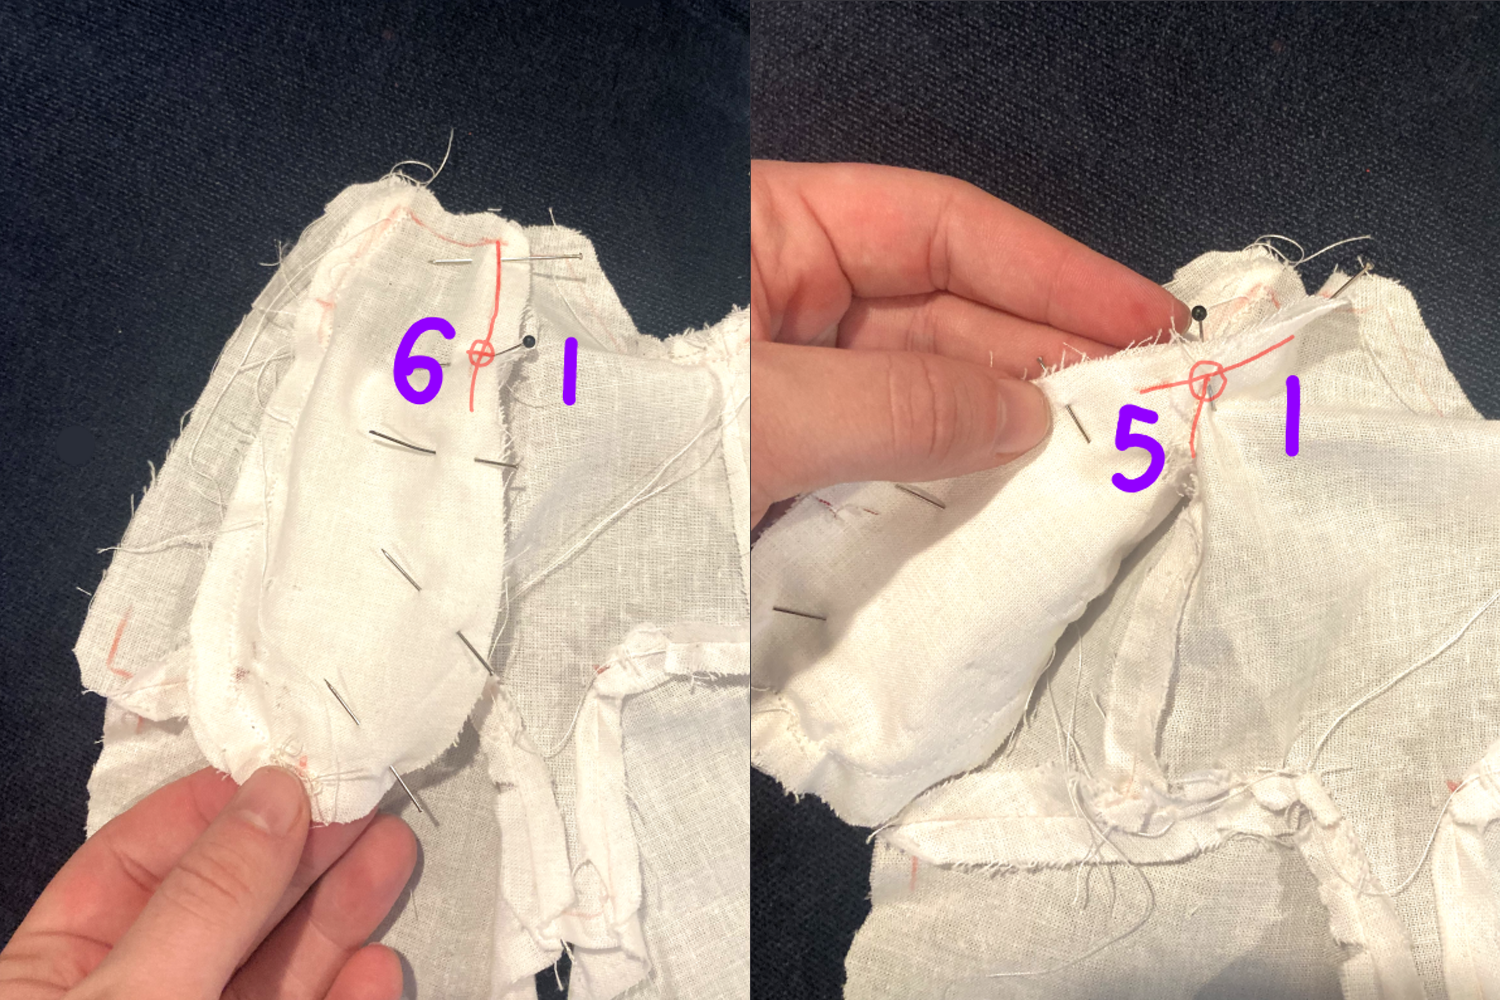
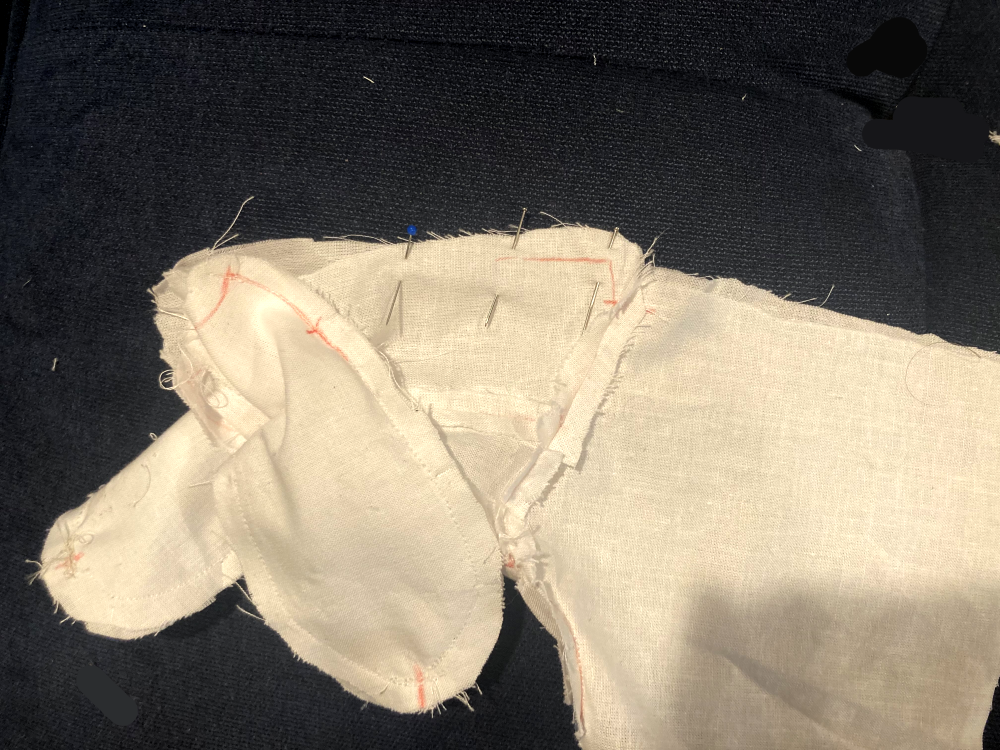
Let’s look at the arm top pieces (6) next to the body we currently have.
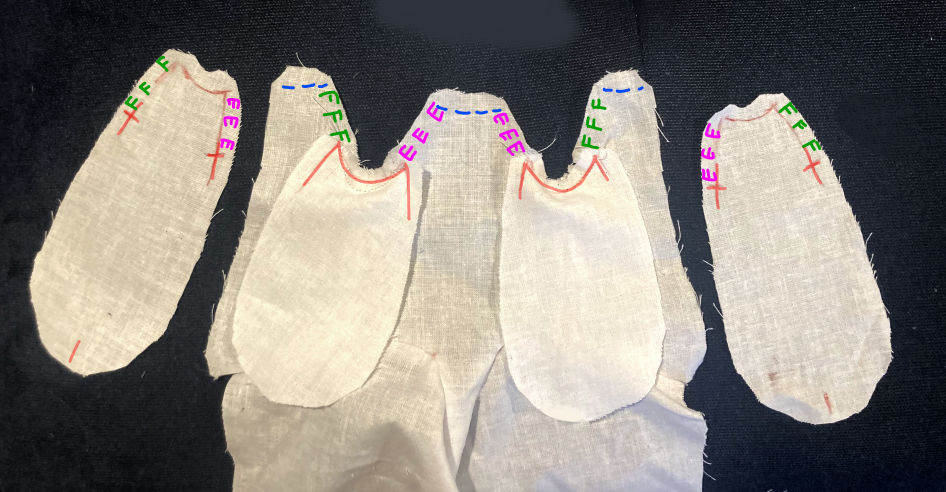
The arm top pieces are longer than the arm bottom pieces. The upper ends of the arm top pieces go up past where the arm bottom joins with the body, extending up the “raglan seams” (marked with E and F in help text). The circumference of the “neck” is formed by the top of the body front piece (1), the top of the arm top pieces (6), and the top of the body back piece (2) all together. The notch at the bottom of the arm top piece needs to join with the rounded end of the arm bottom piece. The notch at the side needs to join with the seam where the arm bottom piece meets the body. The curve at the top needs to form a line along with the parts of the body that are marked in blue in this image, to complete the neck.
We’ll take it one step at a time.
Attach the arm top at the ends
The arm top and the arm bottom don’t line up perfectly, if you lay them on top of each other. The arm top is a little wider and curves a little differently. So we’re going to take it in stages.
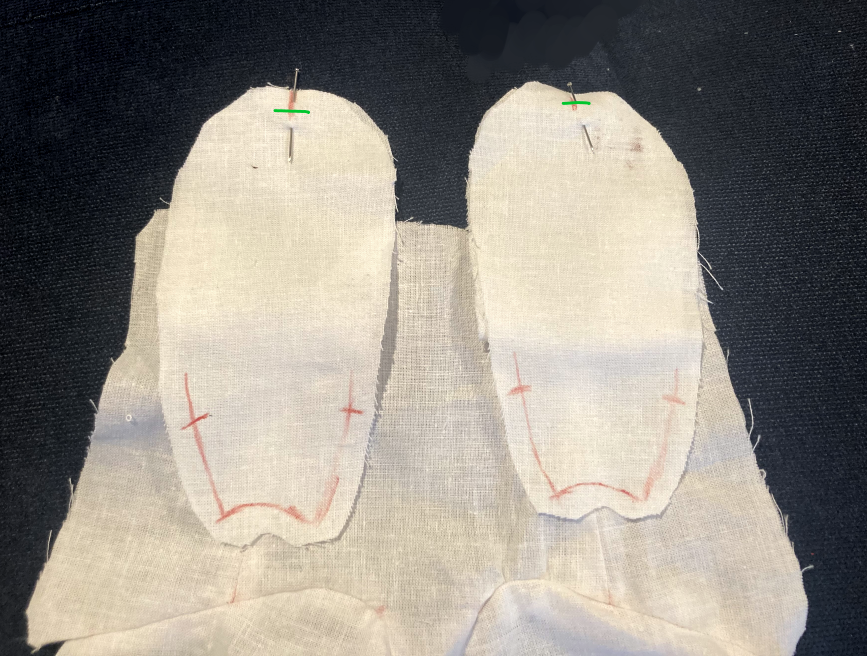
First off: line up the notch at the end of the arm top with the notch at the end of the arm bottom. Make sure your right sides are facing. Sew just a short distance where I’ve marked with a green line.
Align the arm top seam
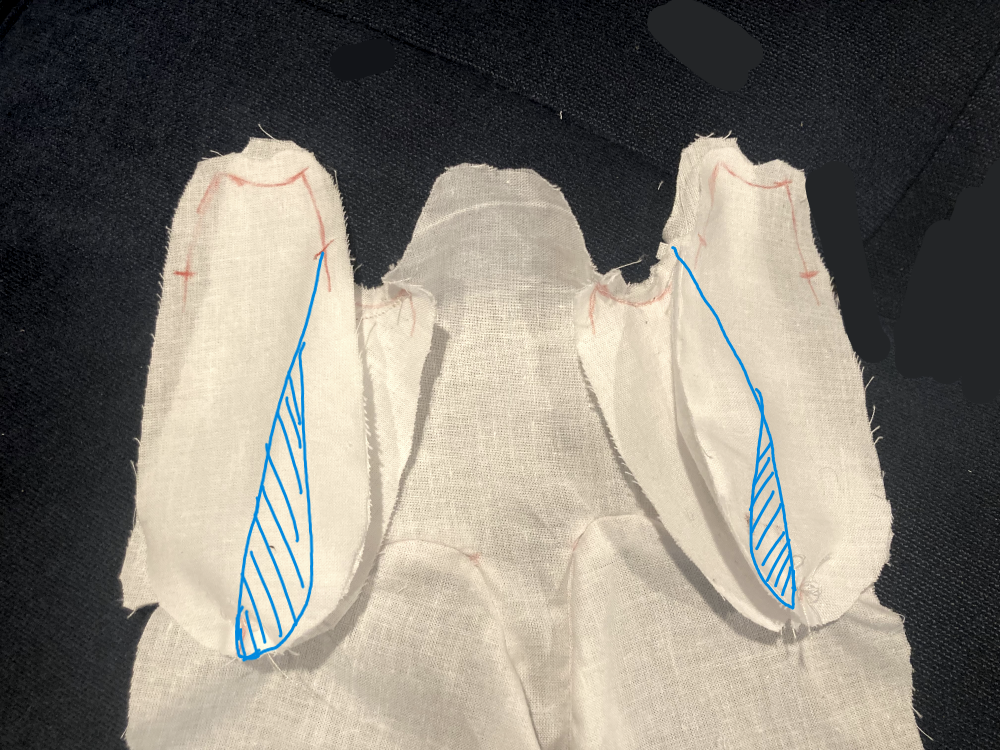
You’re going to turn the arm pieces around and fold them back on themself so that you can align the top of the neck, the armpit notch, and the length of the arms all together with right sides facing. This is a bit complicated. Here’s an intermediate step as you turn the arm tops around so the neck is towards the neck of the body again. Blue lines show how the arm bottom piece is partially folded back on itself underneath, so that the point you sewed in the last step is still holding with right sides together.
Work on one side of one arm at a time. Keeping the right side of the arm pieces together along the side you’re sewing, pin up along the arm from the point you sewed at the bottom until you align the notch on the arm top with the seam where the arm bottom meets the body. Then pin the upper part of the arm top to the raglan curve along the body piece.
Sew one half of one arm, then the other half of that arm, then one half of the other arm, then the other half of that arm.
(Put another picture here of what it’s supposed to look like)
Arms are done!
Finishing the Body
Sew the bottom of the back seam
Remember how the back of the leg doesn’t go all the way to the center back of the body piece? I hope you remembered, otherwise it’s time to go grab the seam ripper.
Fold the body in half so that the back seams match each other. (This is also the step where you should sandwich the tail in the seam, if you’re doing a tail.) Sew from the notch halfway down the back seam to the corner formed at the back. The space from the notch where you attached the leg to the center back seam needs to stay open for now.
Sew the inseam
After sewing the back seam, open the body out and flatten it down so that the folds run down the outside of the two legs. With it open like this, you can see how the flat section at the bottom of the body front piece and the open bits at the bottom of the back match each other. On a pair of pants, we would call this the inseam.
Align and pin those seams, straighten out and pin the legs, and sew the whole inseam in one long line the same way you would when assembling a pair of pants.
Understanding the feet and legs
This step is also hard. If it’s not that important to you for your doll to have flat caps on the ends of its feet, it’s totally fine to just sew straight along the bottom of the legs to close them and skip ahead to working on the head.
If it is important to you for your doll to have flat caps on the ends of its feet, we have a geometry challenge ahead of us.
Math
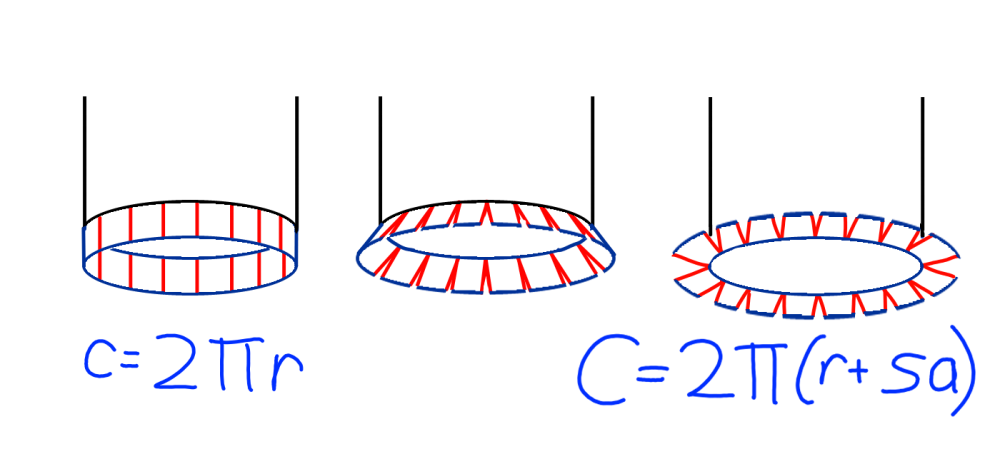
The feet (4) are circles. They have a radius r, with a circumference of 2 _ π _ r. The legs are cylinders. The bottom of the cylinders are circles that also have a radius r, with a circumference of 2πr. That’s all well and good, except that we need seam allowance. Because the seam allowance is added in a straight line, off the end of the leg pieces, it doesn’t change the circumference of the leg circles at all. Still 2πr. But because the seam allowance is added in a circle all the way around the foot pieces, it changes the radius of the piece you actually cut out to r+sa. The circumference is now (2πsa) longer than the circumference of the leg pieces. This is going to cause problems when you try to sew the feet onto the legs, because the seam lengths are no longer the same.
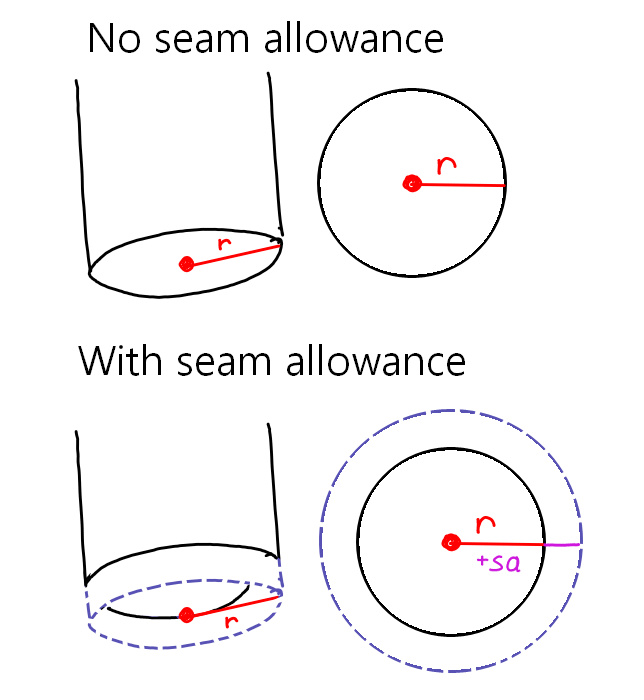
So what are we to do? By snipping the seam allowance at the bottom of the leg pieces, it allows them to flatten and open out to effectively create a bigger circle.
Snip the seam allowance and sew the feet
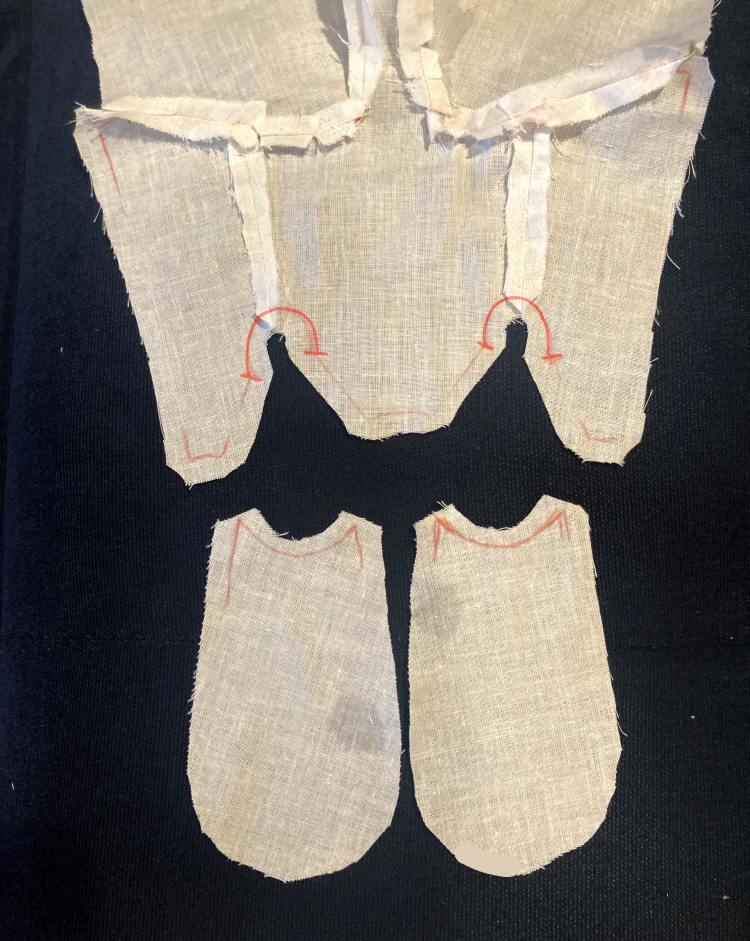
If you chose the anthro legs, the geometry you’re working with on this step is more complicated, but the procedure is the same. The anthro foot (4b) is a rounded rectangle instead of a circle. Make sure the notches at the back of the foot (4b) align with the seams where the foot upper (4a) joins with the back of the leg.
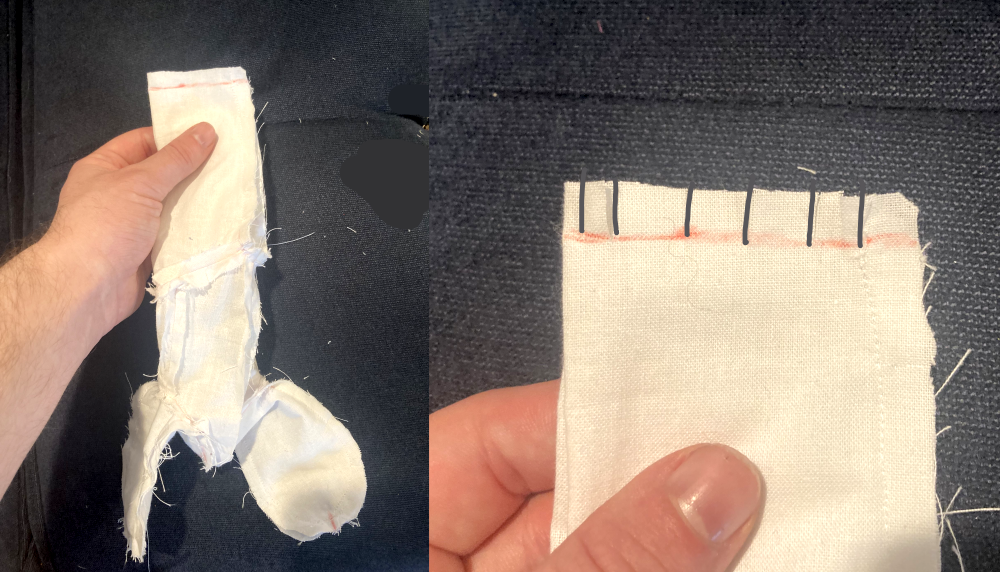
Fold your whole doll in half like this so the ends of the legs are aligned with each other. If they don’t line up perfectly, you can trim the ends of the legs at this step to get a straight line. Mark the seam allowance down from the end of one of the legs, and cut a few snips down to the seam allowance line. You’ll be cutting through 4 layers of fabric.
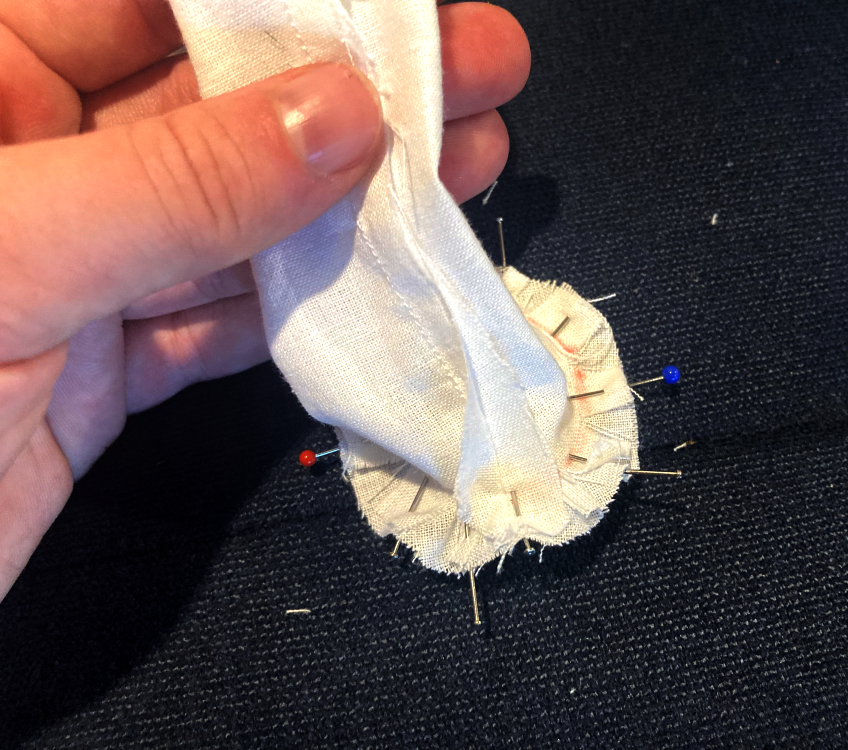
Open this out to flatten the end of the leg into a circle, and pin it around the edge of the foot. This is tricky. Work slowly. You probably need one pin per section you snipped at the end of the legs.
For clarity, here’s another image of what should be happening. The snips through the seam allowance open out into triangles (purple) to create a total circumference that matches the foot piece.
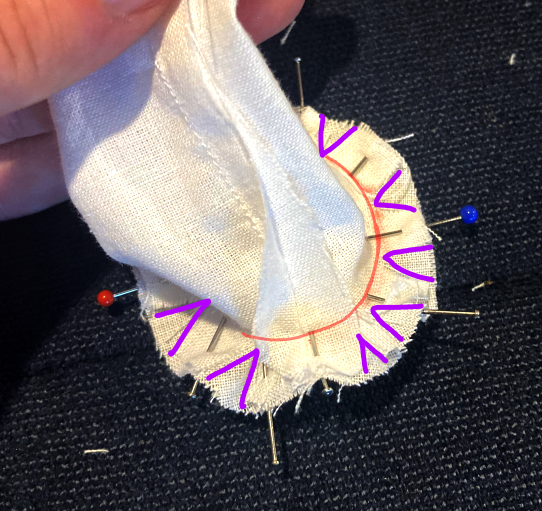
Sew slowly and carefully around the red marked line to attach the foot to the bottom of the leg.
Assemble the head
Decide on your face type
If you want to paint, embroider, or applique a face, it’ll be easier to do that while the fabric pieces are still flat and not sewn together. This is your last chance. If all you want is button eyes, those can wait to be added at the end.
Split or Mirrored Head
If you’re using the split or mirrored head, follow these steps. If you’re using the snout or hairline head, skip ahead to that section.
Close the head darts
Each side of the face (7) has two , forehead and cheek. The head back (8) has only one near the top of the head. You’ll close all six of them the same way. Transfer the seam lines from the pattern pieces onto the wrong sides of your fabric, and transfer the curves at the bottom of the head where the neck will attach while you’re at it. Then fold each dart so both sides of the triangle lay on top of each other. Sew a curved line that tapers off the folded edge of the fabric towards the center of the piece.
Sew the head front together
If you’re using the mirrored face piece, skip this step.
With the good sides together (i.e. the sides where the darts are smooth, not the sides with the extra flaps of fabric), pin the face (7) pieces together and sew the head front seam. The dart seams go to the sides of the head, not the center.
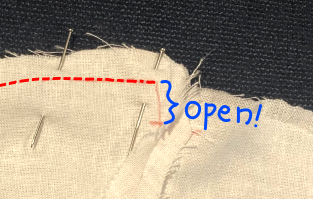
Sew the head back down to the notch
Repeat the same procedure from the last step, but with the head back (8) pieces. Pin the pieces right sides together and sew the center back seam - but this time, you’re only sewing the top half of the center back seam. Leave the bottom of the head back where it will join to the neck open.
Look at your head halves
Regardless of which head you chose, at this stage, you have a head front and a head back. The center of the head front is completely closed, but the head back has a gap in the seam running halfway up the center.
Sew the head back to the head front
This is the part where you should sandwich ears in the seam if you’re doing ears.
Align and sew the head front to the head back. For the split or mirrored head type, the darts at the top of the head will align between the front and back pieces, so you can treat those like extra notches to keep the pieces lined up correctly.
Hairline Head
Follow these steps if you’re using the hairline head. If you’re using the snout, skip ahead to that section.
Attach forelock to face
Align and sew the Face with hairline (7b) to the fluffy Forehead hair (7a) piece, right sides together, along the seam marked by help text with I. The long skinny point of the forehead hair piece meets the end of the dart on the face piece. Repeat this with your other mirrored 7a and 7b piece.
Attach back hair to neck
You have two small pieces marked neck back (8b) and two larger fluffy pieces marked hair back (8a). Snip the curve along the top (the wider curve) of the neck back and the bottom of the hair back, then align them right sides together and sew along this curve. Repeat this with your other mirrored 8a and 8b piece.
Close the darts in all the head pieces
There’s a dart in the hair back piece and a dart in the face front piece. Close both of them on both sides of the head pieces.
Sew the head front together
Align and sew the two head front pieces, right sides facing, lining up the point at the center of the forehead where the hair meets the face piece.
Sew the head back together
Align and sew the two head back pieces, sewing from the top of the hair pieces down to the notch. This leaves space to turn the whole doll inside out later.
Sew the head back to the head front
Align and sew the head front to the head back. This is the part where you should sandwich ears in the seam if you’re doing ears. The placement is somewhat arbitrary, but I would put them roughly level with the dart on the back pieces.
Snouted head
Close the dart in the forehead
The snout forehead (7a) piece has a dart in the center. Fold this piece in half and close the dart.
Attach the nose top to the forehead
Align and sew the nose top (7b) to the snout forehead (7a) along the line marked with help text as H. Right sides together.
Sew the head sides to each other
Sew the snout head sides (7c) to each other, right sides facing, along the line from the tip of the nose to the front of the neck. This curve will want to pucker inwards once the doll is assembled and stuffed, so trim the seam allowance close to the stitching to keep it clean when it’s turned.
If you want to embroider a nose, this is the best point at which to do it. Put it centered at the top of the seam you just made, but be sure to measure down far enough from the edge of the fabric that it doesn’t vanish into the seam allowance in the next step.
Sew the head top to the head sides
The snout head side (7c) has two notches marked along the top edge, that match up with notches on the snout top piece. The head side needs to wrap around the nose top as if it’s the top face of a cube. This is tricky. We’re going to do it one edge at a time, doing first the very front edge, then the sides that
Cut the seam allowance down to the stitching line at both of those notches on the head side. Working from the center, align the snout top between the two center notches, along the line marked by help text with J. Right sides together. Sew this just to the notches where you cut the seam allowance, then stop.
Next, align the point where the snout top (7b) joins the snout forehead (7a) with the notch further along the side of the snout head side (7c), at the other point where you cut the seam allowance. Sew carefully from the edges of the previous seam up to this point on both sides.
The rest of the seam you need to sew is marked with help text with the letter K. Snip the seam allowance in a couple places along this curve on both pieces to let you align the matched curve properly, pin it carefully, and sew up to the edges.
You’re now done with the head front!
Sew the head back down to the notch
Pin the head back (8) pieces right sides together and sew the center back seam - but you’re only sewing the top half of the center back seam. Leave the bottom of the head back where it will join to the neck open.
Attaching the Head
Sew the neck seam
This is why you left those gaps in the back of the body and the back of the head.
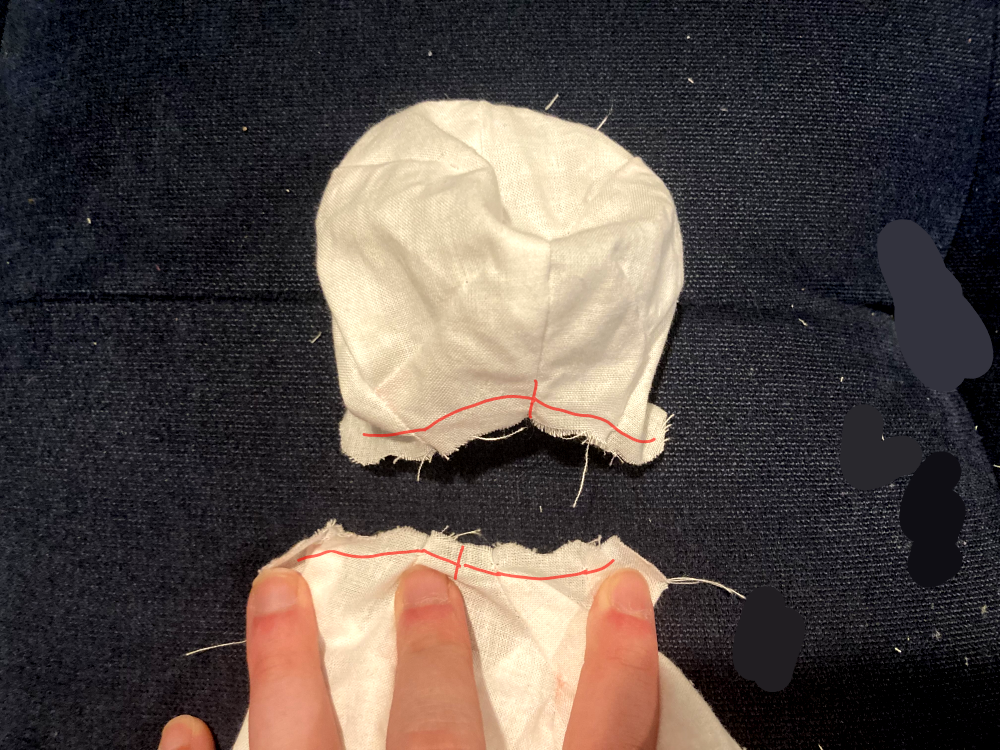
Turn both the body and the head right-side-out, then line up the bottom of the head with the top of the body. The face center seam should line up with the center of the body front piece. The two head side seams should fall right in the middle of the arm top pieces. Double-check that you have right sides facing before you sew this seam.
Finishing
Turn and stuff the whole body through the opening in the back
Push material down into the limbs first, with your fingers or a tool like the back of a pencil, then fill in the head and body to your satisfaction. The most sustainable option for stuffing is to use fabric scraps. If your body is light colored, you’ll want to stick to white or similarly light scraps, but if it’s darker, anything goes. If you want a softer, squishier doll, polyfill is the way to go.
Ladder stitch the back seam closed
And you’re done!
If you’re feeling creative, you can pick out other freesewing clothes patterns and plug in the measurements of the finished doll to make some outfits for it. You’ll have to make some changes to closures on the smaller scale, and the shoulder angle is a bit strange, but a lot of the same principles for clothes fitting still apply.